Depiction Of St. Thomas’s Touch On A Late Byzantine Engraved Gem From The Cheapside Hoard
The Cheapside Hoard
The news of the spectacular archeological find of a wooden box containing a collection of precious stones and gems made a splash in 1912. The treasure was discovered in a rental house in the London suburb of Cheapside, the city’s former center of gold and precious stones manufacturing. This unique collection, dubbed Cheapside Hoard1, comprises more than 400 items dating back to the late 16th and early 17th centuries. High-quality processed jewelry and rich adornments with exquisite gems, such as rings, earrings, chains, broaches and scent bottles, etc. are featured among them.
The collection also includes a host of carvings and reliefs as well as various precious stones from all over the world. Speculation abounds about who the owner of these priceless articles was: a goldsmith or a jewelers syndicate? A jeweler dealing with illegal merchandise and thus attempting to keep his treasure concealed cannot be ruled out, either. Or even a wealthy collector planning to embark on a long journey and looking for a safe place to stash his fortune during his absence could be part of the equation. Anyway, the origin of most of the treasure still remains shrouded in mystery.
An Ear Pendant With A Byzantine Gemstone
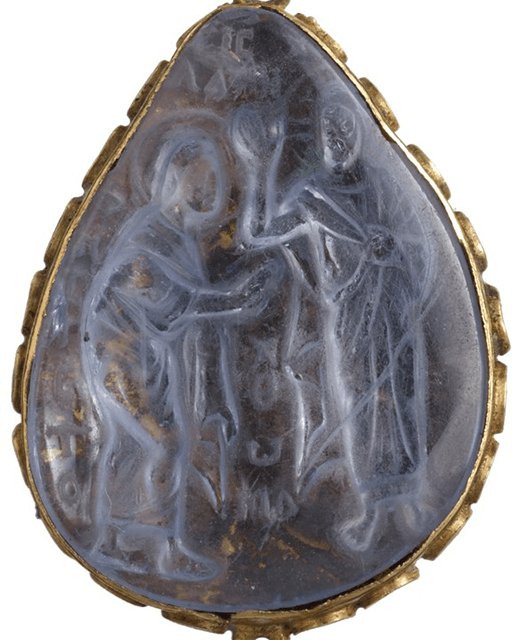
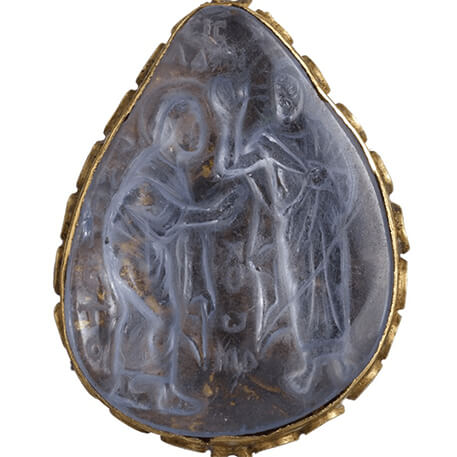
This collection is nowadays on exhibition in the Museum of London. One of its pieces, a precious ear pendant
which was assembled in the 16th century, encloses a carved Byzantine gemstone (Fig.1).

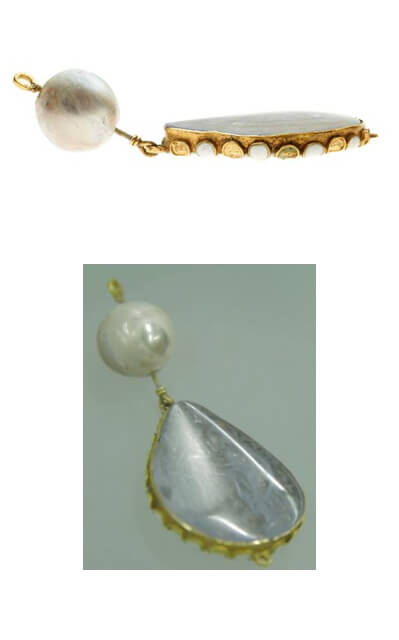
Set in gold, this piece of jewelry boasts high-quality enamel detail adorned with floral motifs on the reverse side. The pendant itself is decorated with a pearl, which most likely stems from the Persian Gulf. The eyelet on the bottom is indicative of some early ornament, which may have fallen off from the pendant. The stone, measuring 33mm x 22mm, is a pale blue, whitish, translucent sapphire with a biblical motif etching on one of its sides. The upper part of the relief was shaped in such a way so as to fit the setting.
The reverse-order insertion thus gives the jewel a flat and smooth surface. That may possibly have been the reason why the engraved picture was somehow concealed, as it would not really be suitable for a lady to wear it. If one wished to obtain relevant data such as the relief height and the carving technique it would be necessary to dismount the setting before conducting the analysis. Providing a hint to its Byzantine origin of the gemstone is the Greek inscription.
Previous Dating Estimates For The Gemstone
Up to now various attempts have been made to establish the gemstone’s age. Initially the Cheapside Hoard Catalog places the gemstone’s origin in the 3rd century A.D.2 In a recent Internet video interview the curator of the Cheapside Hoard, Hazel Forsyth, suggests that the 6th or 7th century could well be in the cards.3 Advancing yet another theory is art historian, who in 1978 claimed that this tantalizing piece of jewelry came into existence Hans Wentzel “perhaps” still during the 10th century.4
Backing up an early dating for this cut stone is the fact that in the Late Antique and Early Byzantine Period discoveries were numerous and well documented.
However, for the Middle Ages reliable information in the field of Byzantine gemology is scarcely available. No overarching directory or a comprehensive compilation has ever been assembled, rendering the task of tracing the stones’ sources based on comparative examples nearly impracticable. 5 As well, so far only a few Late Byzantine gemstones have had their age consistently determined, so that for the majority of them the task of tracking down their origin by and large still appears to be considerably elusive.6 By the same token, relevant insights into their style evolution and iconography are also very patchy mainly on the grounds that many items are scattered among different collections or often held privately
The New Testament Scene In The Gemstone
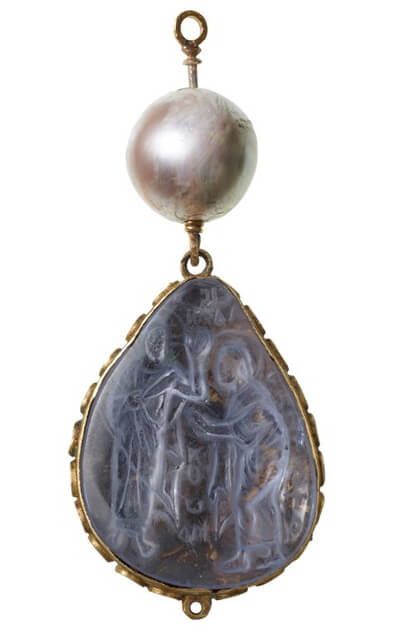
The gem must be turned back-to-front in order to provide an accurate interpretation of the scene depicted. Unfortunately the reverse-order setting
blurs the contours and the inner design. A scene reconstruction would make for a better view (Fig. 2).

At any rate there is absolutely no doubt that the episode in question portrays a post-Easter scene from the New Testament. It shows the risen Christ and the Apostle Thomas according to St. John’s Gospel 20, 24-29: the resuscitated Christ enters through a house’s locked door and appears to his disciples. Thomas, who had not been present in Christ’s first appearance, expresses doubt about his identity and is therefore urged to look at the nail stigmata in his hands as well as touch the wound in Christ’s side as evidence of his rising from the dead. Here is the Greek text, to wit:
24 Θωμᾶς δὲ εἷς ἐκ τῶν δώδεκα, ὁ λεγόμενος Δίδυμος, οὐκ ἦν μετ’ αὐτῶν ὅτε ἦλθεν Ἰησοῦς 25 ἔλεγον οὖν αὐτῷ οἱ ἄλλοι μαθηταὶ ἑωράκαμεν τὸν κύριον. ὁ δὲ εἶπεν αὐτοῖς· ἐὰν μὴ ἴδω ἐν ταῖς χερσὶν αὐτοῦ τὸν τύπον τῶν ἥλων καὶ βάλω τὸν δάκτυλον μου εἰς τὸν τύπον τῶν ἥλων καὶ βάλω μου τὴν χεῖρα εἰς τὴν πλευρὰν αὐτοῦ, οὐ μὴ πιστεύσω 26 Καὶ μεθ’ ἡμέρας ὀκτὼ πάλιν ἦσαν ἔσω οἱ μαθηταὶ αὐτοῦ καὶ Θωμᾶς μετ’ αὐτῶν. ἔρχεται ὁ Ἰησοῦς τῶν θυρῶν κεκλεισμένων καὶ ἔστη εἰς τὸ μέσον καὶ εἶπεν· εἰρήνη ὑμῖν 27 εἶτα λέγει τῷ Θωμᾷ· φέρε τὸν δάκτυλον σου ὧδε καὶ ἴδε τὰς χεῖρας μου καὶ φέρε τὴν χεῖρα σου καὶ βάλε εἰς τὴν πλευράν μου καὶ μὴ γίνου ἄπιστος ἀλλὰ πιστός. 28 ἀπεκρίθη Θωμᾶς καὶ εἶπεν αὐτῷ· ὁ κύριος μου καὶ ὁ θεός μου. 29 λέγει αὐτῷ [ὁ] Ἰησοῦς ὅτι ἑώρακας με πεπίστευκας; μακάριοι οἱ μὴ ἰδόντες καὶ πιστεύσαντες.
The Description of the Scene’s Image
The illustration captures St. Thomas standing on the left-handed side of the scene with his back slightly hunched and his legs astride. His head is surrounded by a halo and he is wearing a long tunic and a pallium. His right hand is reaching out and his index finger is pointing towards Christ’s bare side wound. His downwards stretched-out left hand is tightly clung to his body and is depicted holding a rolled-up rotulus. St. Thomas’s head is gently elevated and leaning sideward, depicting a three-quarter profile.
In a front view next to him the bearded Christ is standing with a cross halo, also donning a tunic and a pallium. He is angling his head towards the apostle and bending his right arm along his head, raising it skywards. He is showing his outstretched hand, where most probably the wounds were inflicted, but the scars are not detectable in the illustration. His fingers are touching both his halo as well as Thomas’s. With his left hand Christ is prying his robe open across his right torso, so as to have the side with the more visible puncture wound exposed. And that is the spot where Thomas’s hand is pointing to.
The Scene’s Greek Inscription
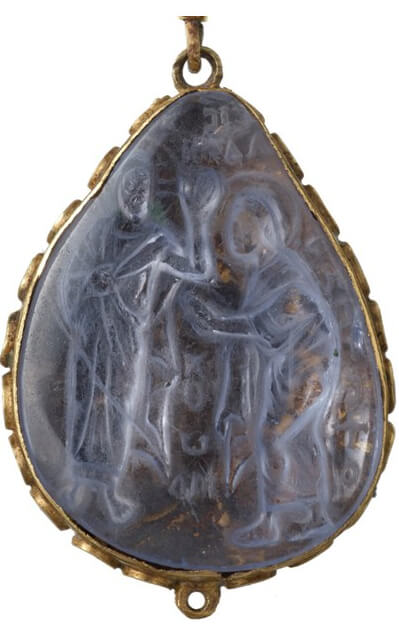
The image features Greek carved characters shown in capital letters on the top and middle of the picture as well as behind the apostle Thomas (Fig. 3).
However, during the refurbishing of the pendant some letters ended up being damaged, causing the original text to become somehow blurred and sketchy.
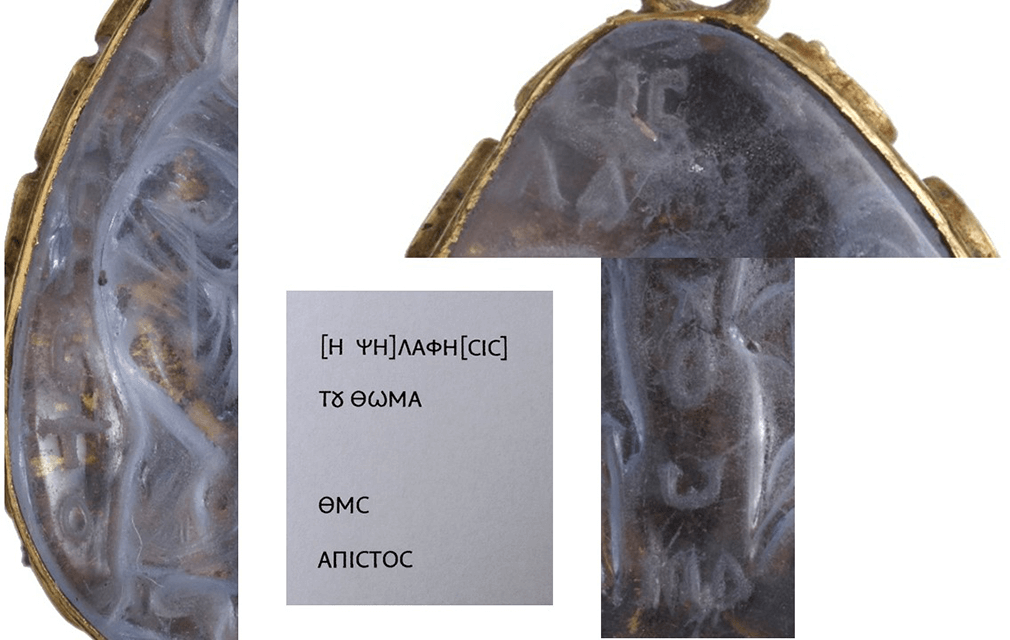
The Christ character is portrayed with the usual overhead ligature for Jesus Christ: IC X[C]. The sigma lunatum on the right-hand side is severed. The inscription related to the Thomas scene is depicted below it, along the middle of the image. The corners on the top were somehow truncated, thus having left only the four middle letters ΛΑΦΗ intact. Lacking are three letters on each side. The remaining part of the existent inscription is vertically etched between the two persons, to wit: TΟΥ ΘΩΜΑ. The TΟΥ is written as an abbreviation. Therefore, based on these premises a reconstruction of the full engraving can be achieved with the addition of the missing letters H ΨΗ to the left of ΛΑΦΗ and CIC to its right, thus presumably reproducing its original text “Η ψηλάφησις του Θωμά“, i.e. the touch of Thomas. In the Painter´s Manual of Dionysius of Fourna, the full inscription is regarded as a compulsory title component for the scene depicting the doubting Thomas.7
Visible behind the apostle are a few more letters, also vertically engraved, suggesting an eventual loss of the stone’s outer left edge, which may have also come about during the refurbishment. This flaw renders the letters rather unsuited for a real meaningful interpretation. In terms of options considered to fill the gaps are the full name of the Apostle Thomas, a bible quote or even the invoking of some patron or donor. This is tantamount to saying that quotations from St. John’s Gospel or references to philanthropists are definitely out of the question. The letters are not all clearly identifiable. In addition, this effort is further compounded by a crack in the stone, which probably ensued during its restoration works. Hence, a designation such as “the incredulous Thomas” would seem to constitute a sensible solution, this being the result of combining the ΘΜC ligature with the word ΑΠΙCΤΟC. The word “Hagios” (saint) had been possibly carved on the top of the picture.
Stylistic Remarks
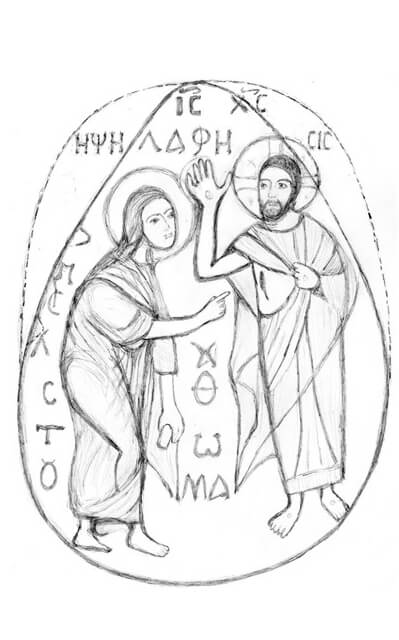
Boasting a balanced space allocation the picture’s surface is amply shared by the two protagonists (Fig. 4).
They seem to be amalgamating into each other through layered arm holdings and an inwards swinging motion of their robes, as if building an intrinsic unity. The figures are well-proportioned and tend to be more on the slim than on the stocky side.
Their sleek head shapes seem to be morphing into a somehow oval-like elongation. Owing to the carving’s reverse setting the inner design of both faces is not clearly discernible. The beams of the cross halo are jutting out somewhat outwards and seem to be randomly filled with ornaments in the interstices. The contours of the arched and full-figured bodies are prominently outlined through the robe wrinkles enveloping them. Thomas’s right leg, with its vigorous muscles vividly bulging under the slightly ruffled pallium, is lingering in a step posture. The workmanlike drape is not particularly detailed or arranged in a strictly linear fashion, but rather harmoniously deployed in light undulations as it swirls around the aesthetically shaped bodies. In the middle of the picture the extremities of the garment are sort of tapering off to function as a frame for the inscription grooved between them. The figures are not portrayed in a passive manner, rather they seem to be strongly interacting, thus creating an almost intimate atmosphere between them. Thomas is captured leaning slightly forwards to Jesus, while the latter is depicted touching Thomas’s halo with his arm. At the same time he is placing his thumb on his own halo, inducing his hand to forge a sense of bonding between the two characters. The way their faces are portrayed seems to be suggesting that there is an eye contact. All in all, these elements of communication help enhance the narrative, elevating it to an intimate level.
The Iconography of the Doubting Thomas During the Early Byzantine Era
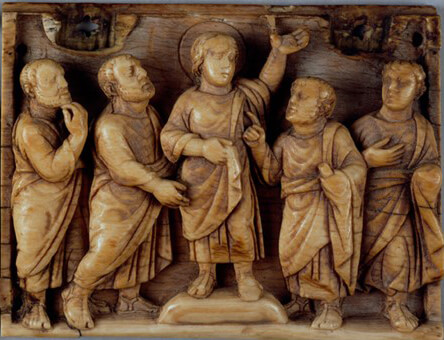
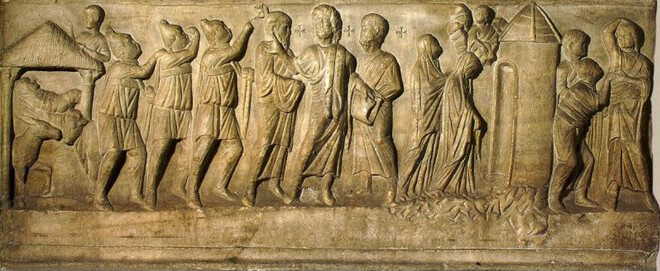
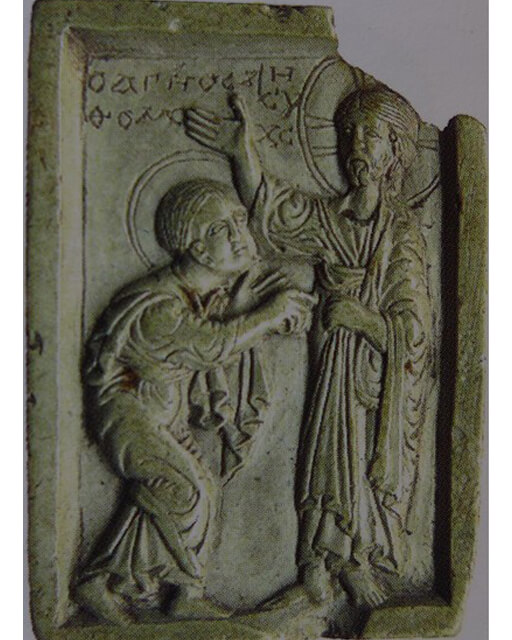
The scene of the incredulous Thomas8 pertains to the more rare examples of Early Christian art depictions (Fig. 5). Dating the carving of the cameo back to the 3rd century can be broadly discarded, since in those times there are no chronicles of art history dealing with the Thomas’s issue. The earliest available evidence emerges in three sarcophagus fragments stemming from the 4th and 5th centuries. Therein the portrayal is built into an abbreviated scene in a sequence of various healing and salvation paradigms, which is how Early Christian funeral art9 was usually represented in those days; a few samples are found in Celsus’s sarcophagus in Milan10, in a remnant in Ravenna11 as well as in a sarcophagus fragment made from African onyx originally found in the Sant’Afra Church of Brescia’s Angela Merici Abbey.12 Still another instance depicting the doubting Thomas is on an ivory-carved panel in the Museum of London, originated in Northern Italy. It features Passion and the post-Paschal scenes (420-430).13 Trying to establish a reliable interpretation for a scene engraved on a
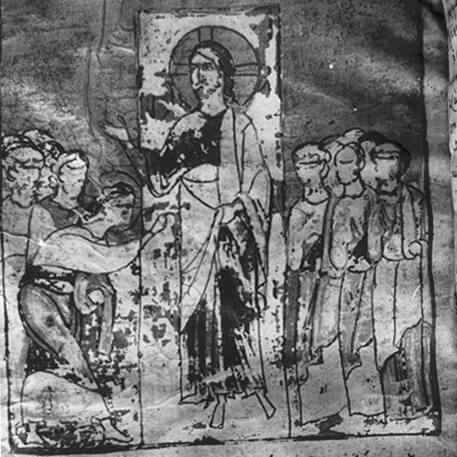
wooden door in the Church of Santa Sabina (around 432) still has remained rather uncertain.14 Solely a few known images can de facto be traced back to the 6th and 7th centuries, among them are a Jerusalem pilgrim flask from Monza15 (around 600), a gold sheet in Berlin16 (6th and 7th cent.), the mosaic cycle in the Church of Sant’ Apollinare Nuovo (around 520) in Ravenna17 and another gemstone from Gadara18 (6th and 7th cent.). For the 8th and 9th centuries testimonial evidence is present on a partially destroyed fresco at the Church of Maria Antiqua (705) in Rome; on an ivory diptych (9th and 10th cent.)19 at Milan and on a silver casket for a gemstone cross from the Vatican20 (around 820). This is tantamount to saying that during the Early Byzantine Period and before the advent of iconoclasm the pictorial theme of the doubting Thomas is not included in the standard repertoire of New Testament scenes. Rather, this honor is more often bestowed on post-Easter scenes where the women are depicted standing at the grave.

The Iconography of the Doubting Thomas During the Middle and Late Byzantine Periods
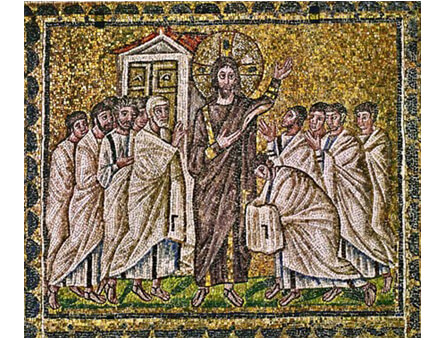
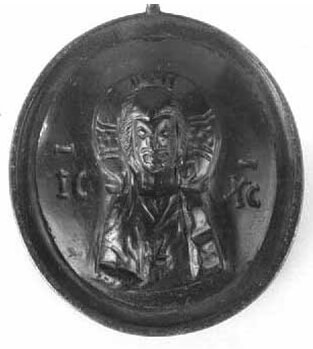
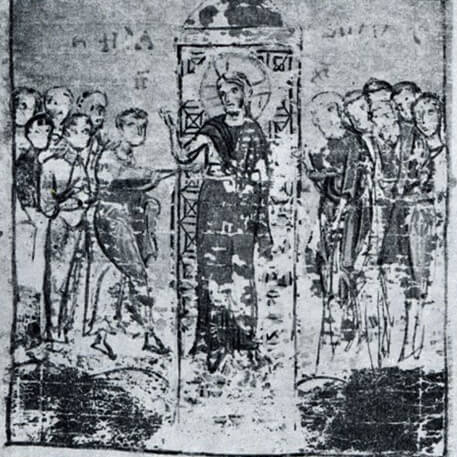
It is not until the 10th century that the incredulous Thomas theme increasingly begins to find favor with all different types of art genres (Fig. 6). As it becomes widespread known the phenomenon reaches its heyday during the Palaiologan Renaissance when it experiences ever-growing popularity. The emergence of the Dodekaorton (a Greek word meaning “twelve feasts”) in the Orthodox Church rituals during the Middle Byzantine Era paves the way for the doubting Thomas scene to be enshrined in the circle of the great celebrations. This feast day of the doubting Thomas is called “Antipaskha” in Greek and falls on the first post-Easter Sunday.
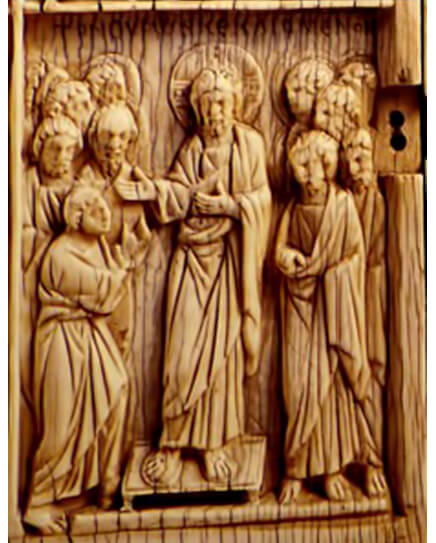
Developing out of these Twelve Feasts was the pictorial canon that would serve as a base for the decoration of churches and icons. Documentary proof in this respect is encountered on an ivory diptych from Constantinople21 (end of 10th cent., beginning of 11th cent.) as well as on a single ivory plate22 (mid 10th cent.); together with other preserved panels this artifact shows a section of an icon portraying the entire Great Twelve Feasts cycle. Both ivory plates associate the doubting Thomas scene with the Twelve Feasts of the Liturgical Church Calendar. The scene is also featured within the mosaic cycles in the principal churches (Katholikon) of the Monasteries at Daphne23 and Hosios Loukas dating back to the 11th century 24.
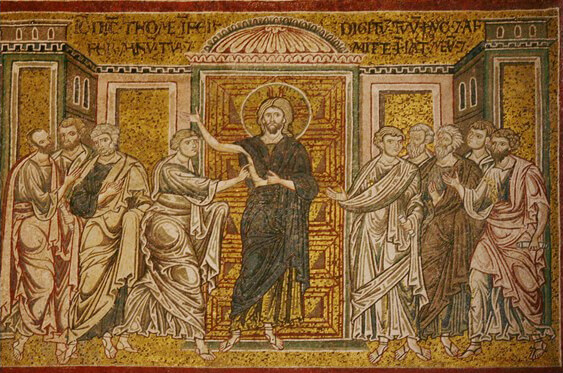
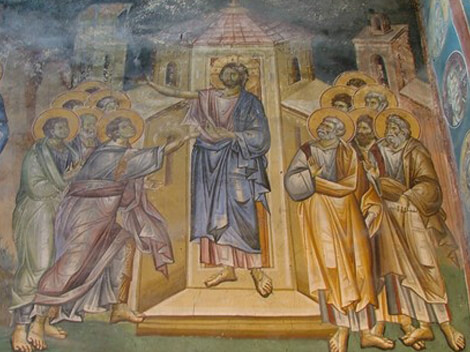
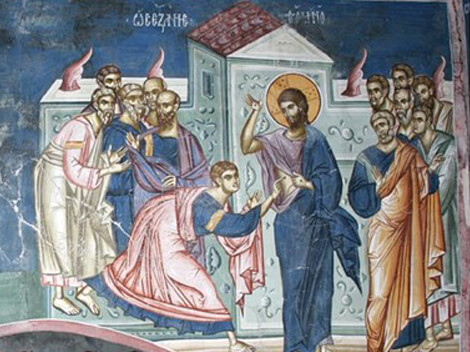
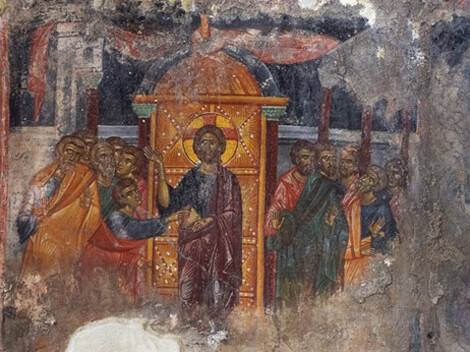
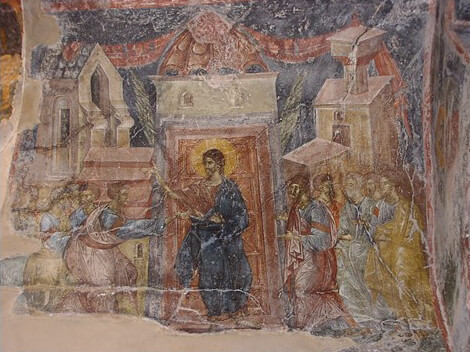
Further evidence is provided in the 12th century by the Monreale25 Cathedral in Sicily and by the San Marco26 Cathedral (around 1190) in Venice. From the 9th century onwards the biblical Thomas episode also appears in several manuscripts in form of illuminations. Only three masterpieces of Byzantine book illustrations figure prominently in this anthology: the Trebizond Lectionary27, stemming from the 10th century and both the closely related Palaiologan scriptures of the Karahissar Tetra Gospels28 (end of the 13th cent.) and the Nikomedia Gospel29 (13th cent.). In the Late Byzantine Period the cherished Thomas image starts popping up on numerous murals and also frequently on icons as it is riding a wave of ever-increasing popularity (Fig. 7). Entering the 13th century numerous examples of minor arts and monumental Wall-painting testimonies depicting the doubting Thomas are unearthed in the dominion’s Byzantine area of influence.
Two of those murals are related to Greece, one in the Church of Mother of God Periblebtos at Mistra30 and the other one in the Church of Apostles at Lithines, Crete (Fig. 8). In the Serbian Empire31 the Thomas scene was an integral part of the ecclesiastical pictorial program of the Palaiologan Period.
However, in terms of gemstones or cameos, there are only two pieces of jewelry featuring the Thomas motif, namely the one on the London gemstone and the other one in the Gadara object.
Evolution of the Pictorial Formula
A standard pattern for the Thomas’s scene was devised in line with the Bible text early on.
Christ
Apart from a few abbreviated sarcophagi versions the key Christ figure always takes center stage in the portrayal. Presenting evidence of his physical rising from the dead remains the picture’s main theme. This is verified by the wound mark resulting from the centurion´s spearhead blow (John 19:33f) to the side of his body as well as the hands and feet stigmata caused by the crucifixion. In the early depictions there are two different art conceptions for the raising of both the right arm and right hand
to show the side wound. But then, in the aftermath of iconoclasm the slightly bent posture of the exposed arm becomes established as the standard picture model as the hand is pointing towards heaven highlighting the scars from the nailing to the cross. Christ is using his left hand to bare his chest at the right side of his robe in order to reveal to Thomas the wound mark inflicted by the spearhead.
Thomas and the Disciples
Surrounding Thomas from both sides is a gathering of disciples, which are frequently laid out in a symmetrical arrangement. In the beginning the number of disciples varies. In Middle Byzantine Period a number of eleven apostles occurs. But subsequently a total of twelve gains currency as a standard. Although a few exceptions spring up during the Early Christian years, Thomas usually is seen approaching from the left side and moving toward Christ’s right in the process. Straddling his legs, with his body somehow stooped and his head bowed, the Apostle Thomas is seen striding in awe toward Jesus. At that stage the halo of Thomas such as the one depicted on the gemstone is only sporadically represented. A common trait encompassing all images is Thomas’s extended and
slightly elevated right arm with the index finger reaching out. Either the finger is directly poking into the wound or, as rendered in the London cameo, it is stopping short of actually touching Christ’s side. The options selected for the position of the left arm are multifarious, among them is the raised position toward Christ, or keeping the arm awestruck close to his breast or even holding an unfolded scroll containing the confession text from St. John 20:28. The furled rotulus in his left hand as shown on the cameo symbolizing his apostolate is encountered throughout, such as on the London Ivory from the 5th century. The scroll is often regarded as a complementary element evoking the Antique in the Palaiologan Renaissance as it is featured both on the stone and in the Apostles’ Church fresco in Peć.
The Background
The background scene portraying Christ’s appearance through closed doors is mostly fashioned according to St. John’s description in 20:26. During the Middle Byzantine Period the focus of the door motif is shifted to the middle of the picture, a good example being the mosaic in the Monreale Cathedral. The Palaiologan Wall-paintings era then sees the emergence of an illusionistic backdrop combining urban architecture with gates; this scene is depicted in the Church of Mother of God Peribleptos at Ohrid (1294/95).32
Summing it up one can say that the period ranging from the 10th to the 11th centuries is marked by a growing continuity in the application of the same pictorial formula and a consolidation of the iconography without however fully curtailing the freedom of adding any details at one’s own discretion. During the Palaiologan Era the theme of the doubting Thomas witnesses a tremendous surge in popularity and dissemination.
Inscriptions in Thomas’s Scenes
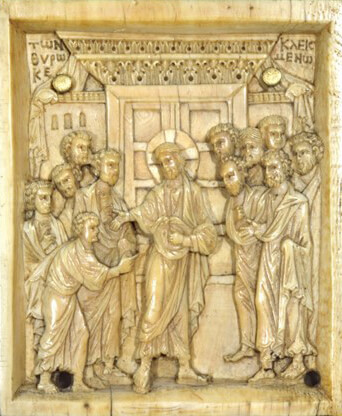

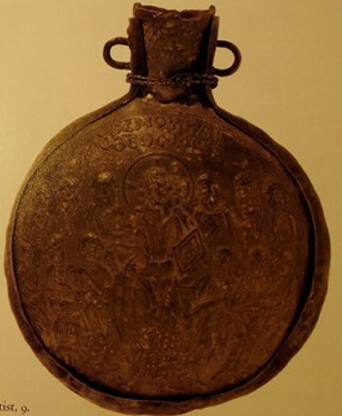
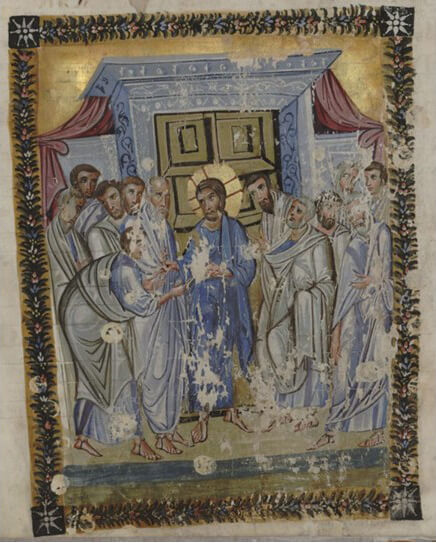
Earlier Thomas’s depictions through to the 10th century are generally devoid of any inscriptions. Neither the names of the protagonists nor the title of the scene are included. There are two specific exceptions to this general rule. The references to Thomas’s confession according to John’s Gospel 20:28 ὁ κύριος μου καὶ ὁ θεός μου are found on the Jerusalem pilgrim flask and on the gold sheet in Berlin, thus avowing the pilgrim’s belief (Fig. 9). In the Gadara gemstone neither the portrayal nor Christ or Thomas are assigned a title or name.33 Bearing a heading for the first time are the Dumbarton Oaks Ivory and the mosaic of Hosios Loukas. With the inscription ΤωΝ ΘΥΡωΝ ΚΕΚΛΕΙCΜΕΝωΝ, which is quoted from St. John 20:26 Christ’s wondrous appearance to the disciples is described.
In the Greek-speaking territories this scene title is to remain the usual standard for the period covering the 10th and 12th centuries. The readable lettering H ΨΗΛΑΦΗCΙC ΤΟΥ ΘωΜΑ which is etched on the London gemstone and which is also recorded in the Painter´s Manual from Mount Athos, can only be tracked down to the Palaiologan Era, but not before the 13th century. This is also consistent with the Thomas fresco in the Protaton Church at Karyes on Mount Athos (1295), where the title is clearly shown in the upper pictorial space as well as with the Nikomedia Gospel illumination from the 13th century (Fig. 10). The scene inscription on the cameo strongly suggests that it originated in the Late Byzantine Period.
Comparative Examples: The Gadara Gemstone
Since there is an absolute dearth of pieces of jewelry allowing direct comparison with the unique Cheapside Hoard gemstone, a matchup with other artifacts featuring similar stylistic and iconographic traits is utilized in a bid to ferret out the dating. Basically the gemstone’s scene reflects the classical canonical pictorial formula.
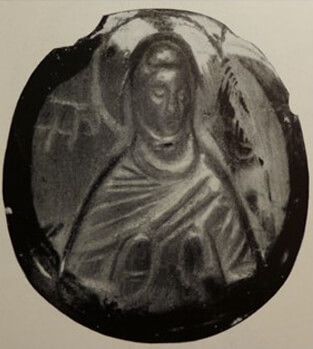
With the omission of the other disciples – justified by a lack of space – the picture is solely confined to two protagonists: the Apostle Thomas and Christ. This shortened version is also reproduced in the Gadara gemstone, although the two characters are standing next to each other in a taut posture showing no signs of any contact (Fig. 11).
From the pictorial space both are looking simply straightforward, while in the London gemstone the characters’ mutual devotion, presence and expressiveness help conjure up an image of an almost intimate atmosphere of togetherness between them. These two disparate renditions run counter to the assumption that the origin of both gemstones is concomitant. This is further substantiated by iconographic differences in the background layout. For example, in the Gadara image a building behind Christ and a cross behind Thomas are visible, whereas no backdrop is present in the Cheapside Hoard gemstone, probably because both protagonists fully occupy the whole pictorial space.
However including a plain architectural door frame would have been feasible given there is plenty of room available. Likewise noteworthy is the distinction in the stylistic execution. In the Gadara icon flat and linear drapes sort of cover the body and skewed figures with false proportions come to the fore. By contrast, in the London version the drapes are perceived to impart soft contours to the bodies as their vivid, space-filling and harmonically shaped frames seem to float gracefully in the air. Hence, it is fair to say that there is a wide time gap between the two gemstones in terms of iconography and stylistic.
Comparative Examples: A Steatite Icon From Warsaw
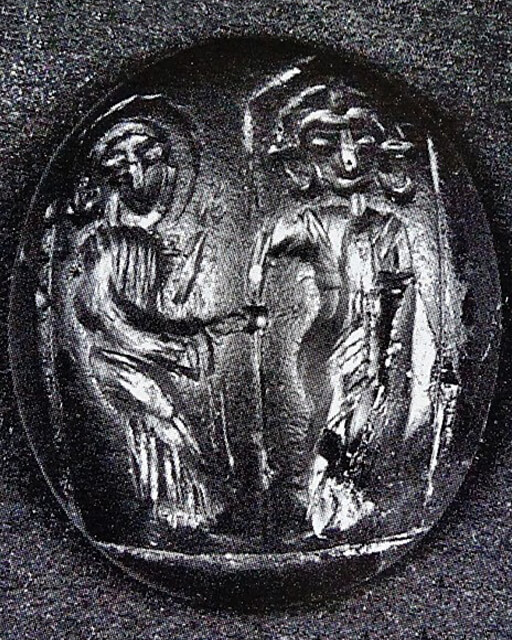
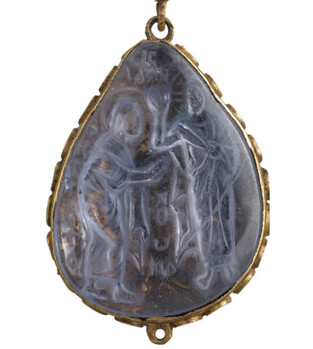
The odds of dating the gemstone to the aftermath of the iconoclastic period, when the pictorial scheme became firmly entrenched, seem to be extremely likely. Making the most sense would be an association with the Palaiologan Era as the Thomas theme becomes widespread disseminated and its popularity is on the rise. Supporting this claim is a small Byzantine steatite icon pendant, which is also dedicated to the Thomas theme34 and which is deemed to share a significant iconographic affinity with the Cheapside Hoard gemstone (Fig. 12). Its origin can be traced back either to the late 12th century or to the early 13th. Both the London gemstone and the steatite icon boast a similar layout with the characters filling the entire space
and in the exact same position, although without an architectural backdrop. Compatible with each other are also Thomas’s head and body postures, including the halo and Christ’s lean and frontal frame with his head angled slightly sideward. With his arm raised and bent at the elbow Christ is even touching Thomas’s face. These striking similarities forge a close time relationship between these two pieces of jewelry.35 In terms of stylistic, however, an earlier dating would be called for. With its clogged style and jagged edges, giving it a somehow restive and curvaceous rhythm the steatite icon’s drape does not quite stack up against its London peer, which seems to exude a calmer and a more easy-flowing form language.
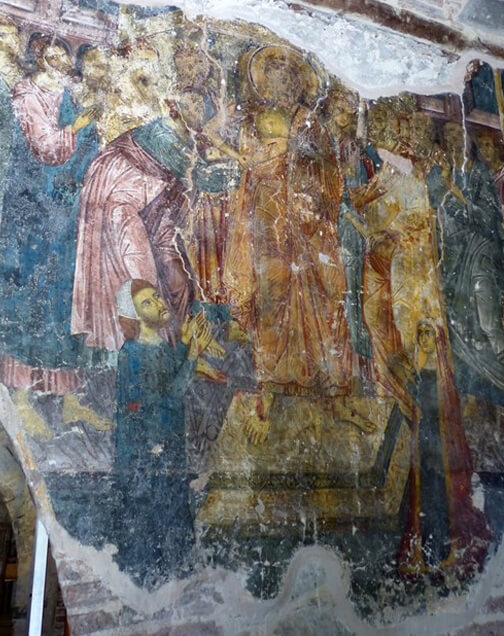
Comparative Examples: Palaiologan Murals
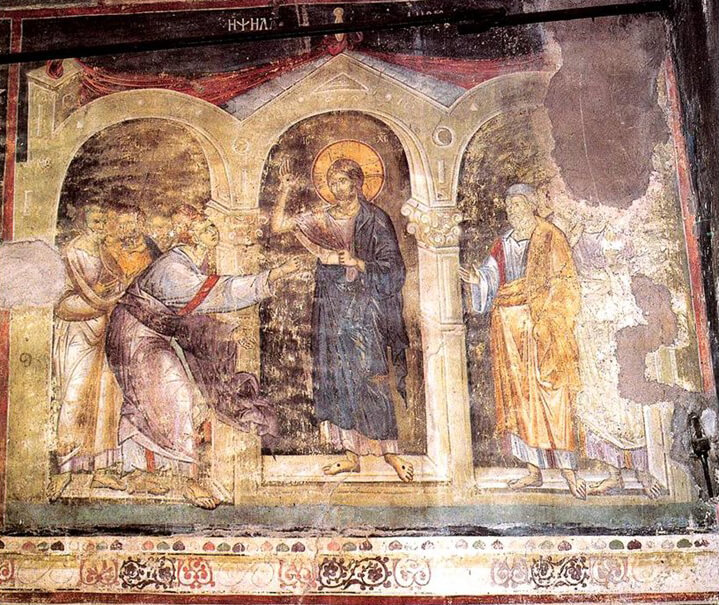
The cameo pictorial style, characterized by plasticity, aesthetics and harmony, dovetails smoothly with the classicistic style of the Palaiologan Renaissance, which begins developing by around 1300. The Thomas scene in the Church of the Apostles in the Patriarchate of Peć (1260–64)36 provides a fine illustration of this “beautiful style”, which is how R. Hamann-MacLean37 described it (Fig.13). The supple elegance, the fluid shape of the robe structure and the slight modeled inclination of the bodies are also
encountered in the London piece. Another example of this trend can be witnessed in the high-quality frescoes of the Parekklesion in the Kariye Camii (around 1320)38 in Istanbul. They seem to go hand in hand with the cameo style elements as capital city murals, following a more classicistic-academic approach, also begins to focus on a plastic and a subtly designed figure style showing harmonically proportioned body shapes clearly delineated under the garment.

Comparative Examples: Cameos and Book Illuminations
The peculiarity of the oval-shaped, yet delicate and lithe head type is another indication of dating the London gemstone to the period around the year 1300.39 The same moulds are also represented in a

In addition, two more contributions are recorded from the field of Palaiologan book illustrations: the Karahissar Four Gospels and the Nikomedia Gospel from the 13th century (Fig. 15). Despite espousing diverse concepts in the composition of illustrative details both these paintings share many iconographic analogies with the London artifact.43 Even the stylistic similarities in the figure pattern seem to be absolutely striking. The erect Christ frame as well as the shape of the Thomas figure heavily underscoring his right leg side with the soft drape wrinkle are also depicted in the cameo. One could almost say that the Thomas portrayal in
the Nikomedia Gospel could have served as a painted template for the gemstone. All these uncanny parallels have helped establish a place- and time-related connection between all these three masterpieces of art. It is assumed that the Karahissar Codex was painted in a royal palace scriptorium in Constantinople.44 By the same token the cameo´s exquisite craftsmanship reinforces the theory that the processing works were carried out on the premises by an expert cutting master. Verifying this assumption once again is also the gemstone’ refined style, uniqueness and high esteem.
Advancing a New Dating Proposal
The stylistic and iconographic findings of this review as well as the chronology of the inscriptions bear out the fact that the current valid dating for the gemstone’s artisan work needs to be reevaluated. It should be ascribed to the Palaiologan Renaissance somewhere between
the end of the 13th and the beginning of the 14th century. Concerning the setting the 16th century would be the terminus ante quem. An allowance should be made for a longer hiatus between the gemstone’s subsequent use as a pendant and the carving of the scene, though.
Sapphires in the Byzantine Glyptic
Precious sapphires have been an extremely rare breed in the glyptic art domain.45 In view of their high value the processing of the stones required continuous top-notch expertise and was mostly performed in Constantinople46 or alternatively in other capital cities. As early as in the 12th century Theophilus Presbyter47, a monk who wrote about handcraft in the Middle Ages, emphasized how painstaking and intricate the task of cutting sapphires was. These difficulties notwithstanding the Late Byzantine Period left a rich legacy of cut blue sapphires including an array of cameos and intaglios that have been preserved in scattered collections such as the assortment in the Kremlin Museum in Moscow48 and the Dumbarton Oaks Collection.49 Blue sapphire cameos50, whose dating to anywhere between the 10th and 12th centuries is only tentative, comprise another large group.
But a white and transparent cut gemstone as the London piece is no doubt a one-off specimen. No other similar artifacts have been known to exist. The unprecedented rarity and exquisiteness of this diaphanous sapphire could lead to the assumption that this is rather a reutilization of an old uncut stone perhaps stemming from a crown, relic or some precious church adornment. And the gemstone’s donor, whoever he or she was, proceeded then to fashion the carving into the desired forms according to his or her own specifications. In any case, the 13th and 14th centuries saw the art of glyptic experience a renewed surge not only in France and Italy but also in Byzantium.51 In this period many prestigious collections of antique gemstones had their foundations laid as efforts were being focused on emulating classical traditions in the craft of carving and engraving.
Use of the Gemstone
Saint Thomas was presumably the patron saint name of an upper-crust member of the Byzantine aristocracy, who either commissioned the scene’s carving on the gemstone or received the cameo as a gift from a patron. His halo and the deep association with Christ add relevance to the Saint Thomas character. Placing the main focus on the two protagonists rather than molding the scene into an architectural context conveys a sense of intimacy and trustworthiness to the rapport between Thomas and Christ. During the heyday of the Western art, in the Quattrocento period, this motif became very fashionable.52 During the Palaiologan Era scenes capturing the Apostle Thomas
enjoyed prominent status among donors, especially in the royal and aristocratic society (Fig. 16). One such instance is the Wall-painting in the Church of Timios Stauros at Pelendri on Cyprus (before 1375), which depicts a pair of donors standing with imploring hands before Christ, who is pictured leading the hand of the incredulous Thomas into his side wound.53 Another one is an icon from the Metamorphosis Monastery at Meteora (1367-1384)54 with a slightly altered image due to the inclusion of a female royal sponsor plus a male individual55 within the pictorial scene behind the apostle Thomas.
The Gemstone as a Protection and Salvation Icon
The Thomas motif bears testimony to the personal piety and belief of surmounting any doubts its owner or donor may have harbored. The depiction of the physical wounds of Christ risen from the dead implies a sense of identity between his Pre- and Post-Easter Body. For the owner of the gemstone this amounts to proclaiming his allegiance to the Orthodox doctrine against heretical views, thus accepting both natures of Christ as well as his physical resurrection. Hence, he identifies himself with the Apostle Thomas, who is cast in a role model as a conqueror of incredulity. Together with Thomas the cameo’s owner joins Christ’s inner relationship circle, feeling encouraged to take part in the quest for God´s salvation. The gemstone is also deemed to act as a soteriological beacon of hope for the eternal redemption of souls at the end of time,
fully relying on the Apostle’s support and intercession to achieve this goal. All these aspects serve to assert the fact that still within the Middle Ages precious gemstones were thought to possess a magical effect or play a protection role as a lucky charm.56 This fascination is unequivocally corroborated by the Warsaw steatite icon, which was worn as a “pendant icon”57 around the neck and was considered a symbol of private devotion for the upper class.58 Another thesis is that the gemstone was possibly set in the middle of an encolpion or fitted into a pendant as testified by the steatite icon. The cameo might highly valued as possessing magical powers like an amulet. The virtues embodied in the gemstone represent a guarantee of current protection, everlasting salvation and future redemption for the bearer.